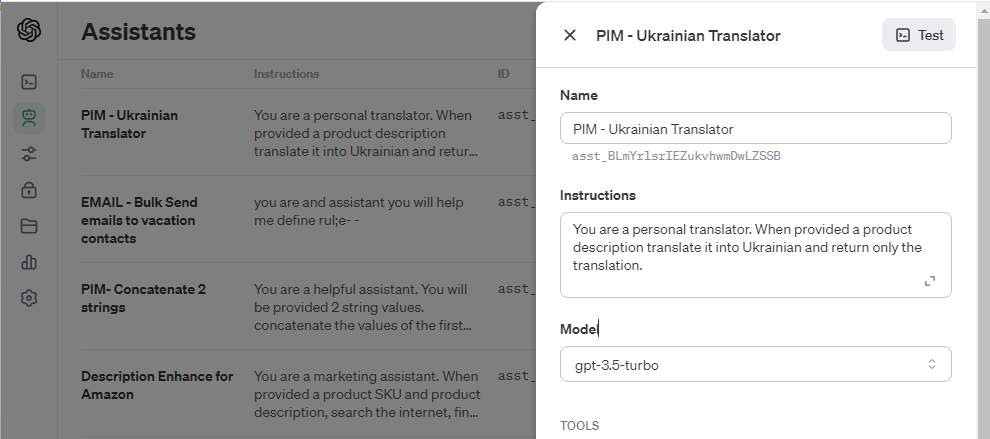
PIMInto PIM data management has been integrated with openai.com. In order to utilize the AI integration in PIMInto you must have an account on
https://platform.openai.com/ for text generation. Signup is available by clicking on the "Sign Up" button on openai.com
AI, or Artificial Intelligence, offers significant advantages for Product Information Management (PIM). Here are some ways AI contributes to enhancing the data stored in a PIM system:
Data Quality and Accuracy: AI algorithms can automatically check and correct product data for errors, inconsistencies, and duplications. This ensures high-quality, reliable data across all
channels.
Automated Data Entry and Classification: AI can automate the process of entering product information into the PIM system. It can also classify products into the correct categories based on their attributes, saving time and reducing manual labor.
Language and Localization: AI-powered tools can assist in translating and localizing product information for different markets, ensuring accuracy and cultural relevance.
Image Recognition and Processing: AI can be used to automatically tag and organize product images, and even enhance their quality, which is crucial for online retail.
In summary, AI significantly streamlines and enhances various aspects of Product Information Management, from data entry and quality control to customer experience and market analysis, making it an invaluable tool in today's digital and e-commerce landscape.
Once an account has been created on
https://platform.openai.com/ the PIM can utilize the AI through
API keys and apply the results returned from
AI Assistants to the product data stored in the PIM. Clicking the links in this paragraph will take you to the corresponding help topics in the
OpenAI documentation. Use of OpenAI is not free. OpenAI will charge for use of its AI. Any charges related to using OpenAI in conjunction with PIMInto PIM is between you and OpenAI. Please make sure you are familiar with OpenAI's pricing and terms of service.
Currently at the time of writing this article the PIM supports usage of all AI models including gpt-3.5-turbo, all the way through the gpt-4-turbo-preview. The PIM should support all new language models as they are made available.
Once you have created your Open AI Assistants and API Keys you can access the AI Assistance from the PIM by following the steps below.
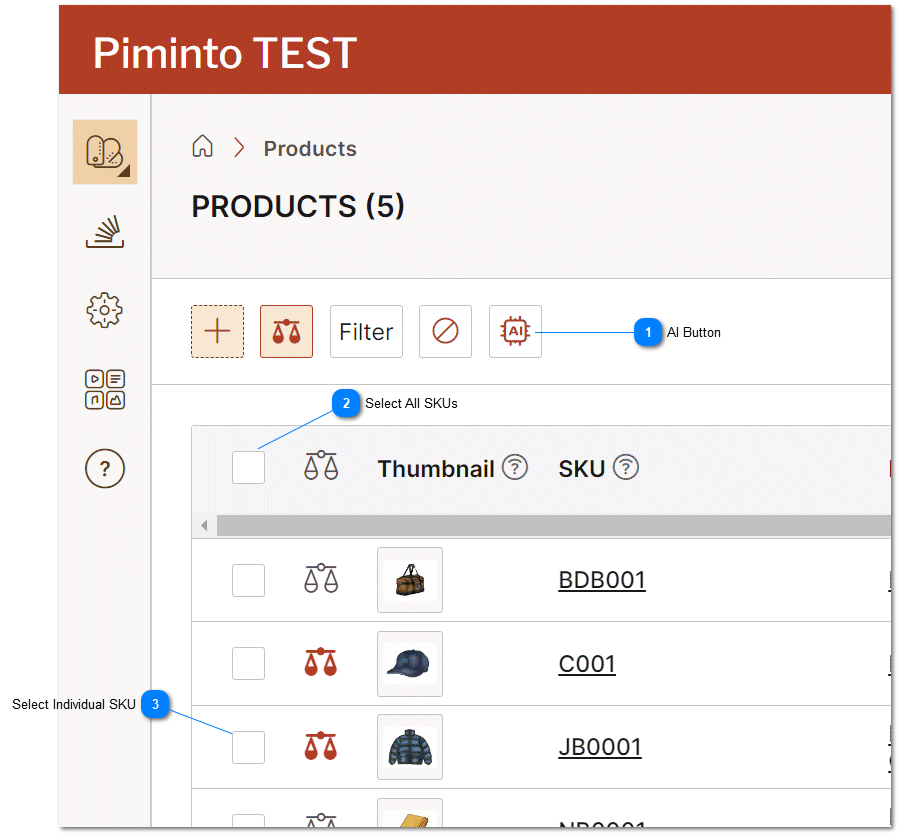
 AI ButtonOpens the AI dialog integration with OpenAI that allow the bulk execution of AI tasks that can modify product data in the PIM.
|
|
 Select All SKUsSelect all SKU's on the current page. The selected SKU's data will be used to create AI Assistant tasks in https://platform.openai.com
|
|
 Select Individual SKUSelect a specific item or SKU's on the current page. All selected SKU's data will be used to create AI Assistant tasks in https://platform.openai.com
|
|
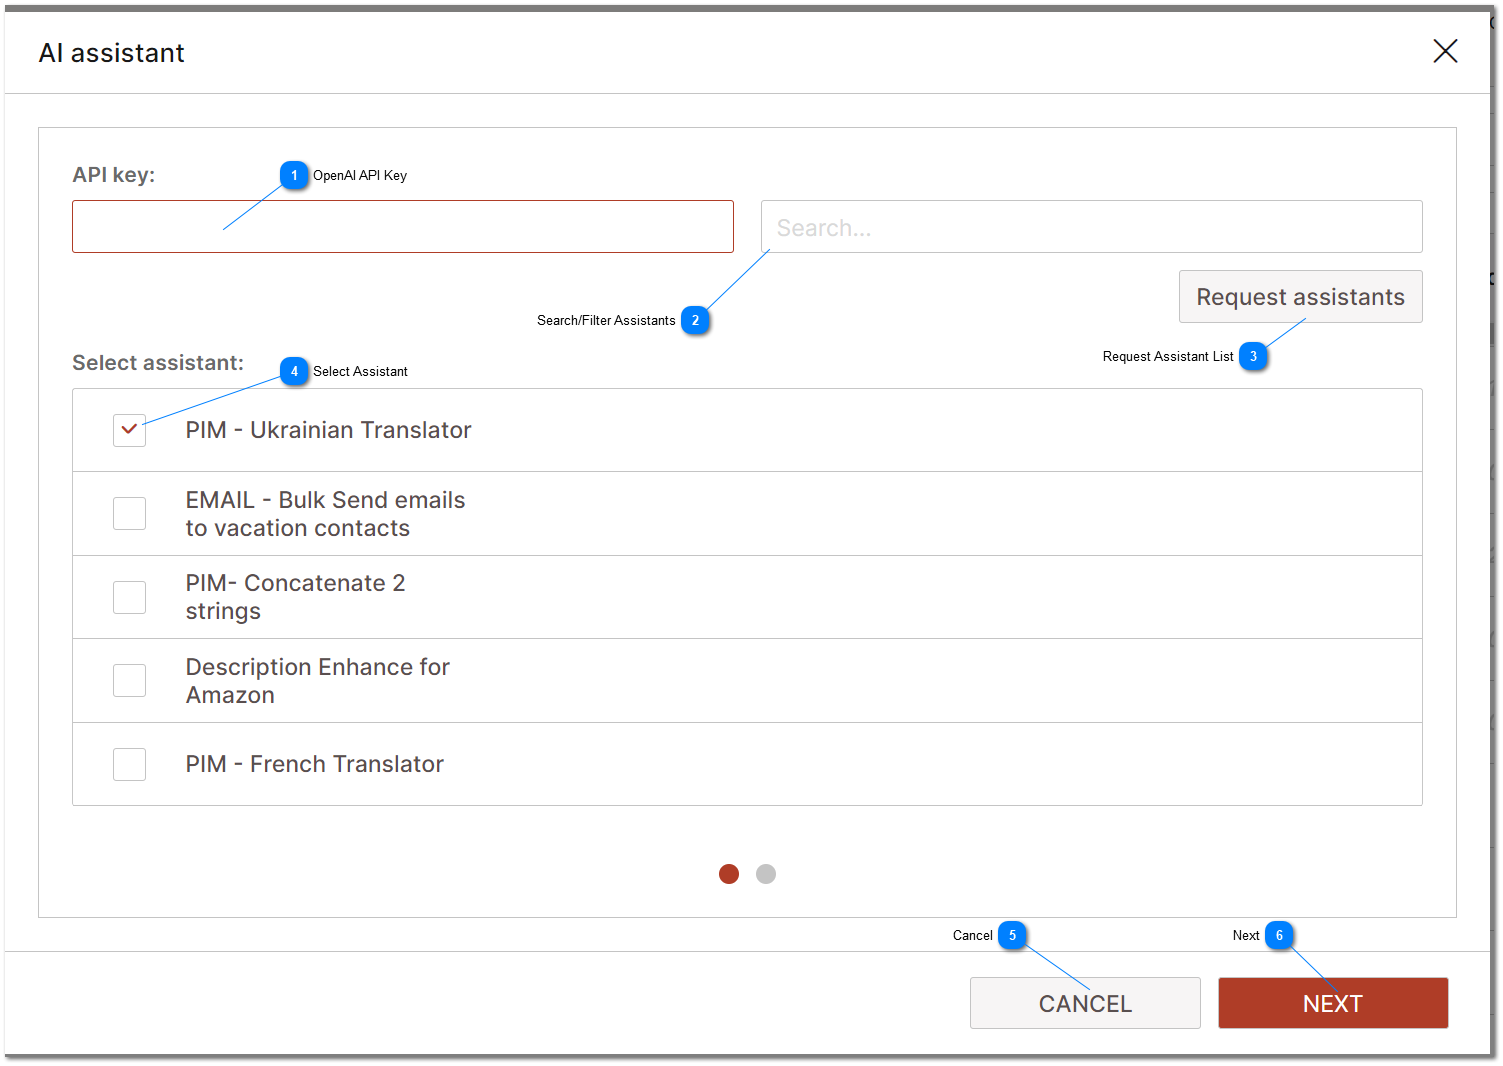
 OpenAI API KeyAn API key is required to connect to OpenAI. Use of open AI is not free. You will be charged by OpenAI for use of it's services.
|
|
 Search/Filter AssistantsAllows filtering of the list of AI assistants utilizing the text that is typed into the search dialog
|
|
 Request Assistant ListRequests a lists of available assistants from OpenAI using the AIP key that was provided.
|
|
 Select AssistantAvailable assistants are displayed in a list in the user interface. Select the AI Assistant that performs the desired action. This is the AI Assistant that will be utilized to perform, data modification on the selected SKU data in the PIM
|
|
 CancelSelect cancel to abort any actions and close the current dialog without creating any AI tasks
|
|
 NextSelect Next to move to the next step in the AI integration dialog.
|
|
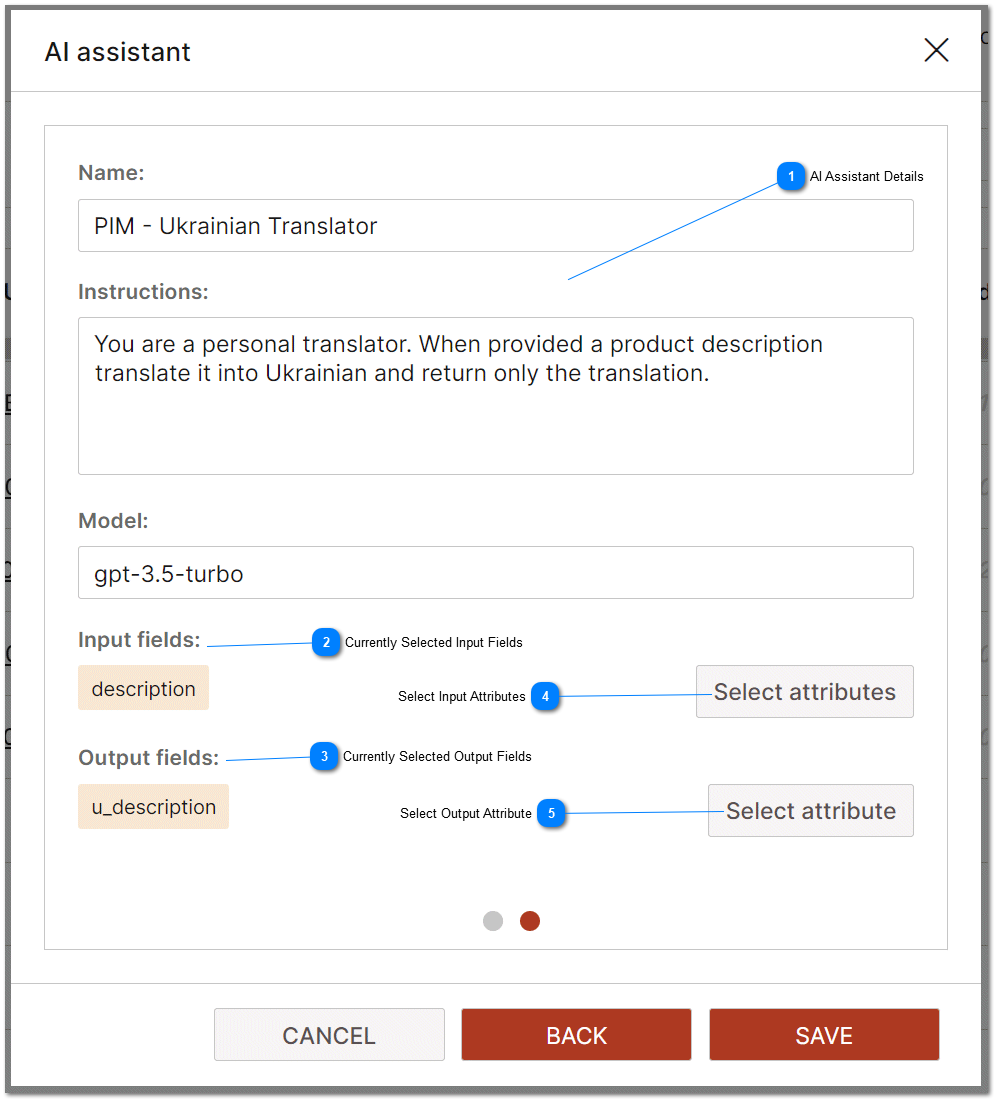
 AI Assistant DetailsOnce an AI Assistant is selected and the user clicks next the details about the AI assistant are displayed on the screen. This provides the user with the ability to confirm that the instructions that have been provided to the AI assistant. The instructions that are displayed will be used by the AI assistant to generate tasks that will modify data for selected SKU's in the PIM
|
|
 Currently Selected Input FieldsThe input fields represent the data for each product or SKU that will be passed to the AI assistant for modification. In the case of the example displayed in this help topic, the English description will be passed to the AI for translation into the Ukrainian language for each selected SKU.
|
|
 Currently Selected Output FieldsThe output fields are where the data returned by the AI Assistant will be placed for each product or SKU upon completion and approval of the AI task.
|
|
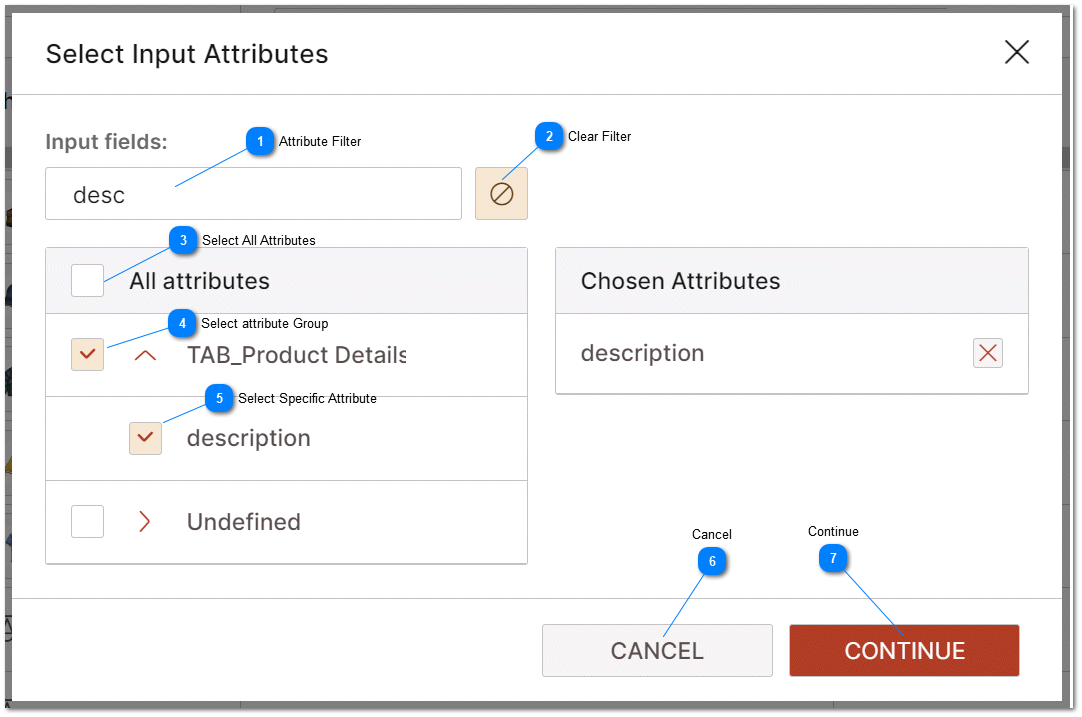
 Select Input AttributesSelect Input attributes button opens a dialog that allow the user to select the attributes that will be passed to each AI tasks as input data.
|
|
 Select Output AttributeSelect Output attributes button opens a dialog that allow the user to select the attributes that will be used to store the AI Assistants results upon completion and approval of the AI Tasks.
|
|
 Attribute FilterFilter the list of displayed attributes base on the text typed into the filter dialog. This makes it easier to find specific attributes when the number of attributes defined is very large.
|
|
 Clear FilterClear the filter and display all attributes.
|
|
 Select All AttributesSelect all attributes in the list of attributes.
|
|
 Select attribute GroupSelect a specific attribute group (thereby selecting all attributes that belong to that group.)
|
|
 Select Specific AttributeSelect a single attribute.
|
|
 CancelSelect cancel to abort selecting attributes, close the current dialog and return to the previous screen.
|
|
 ContinueSelect continue to finalize selecting attributes and return to the previous screen.
|
|
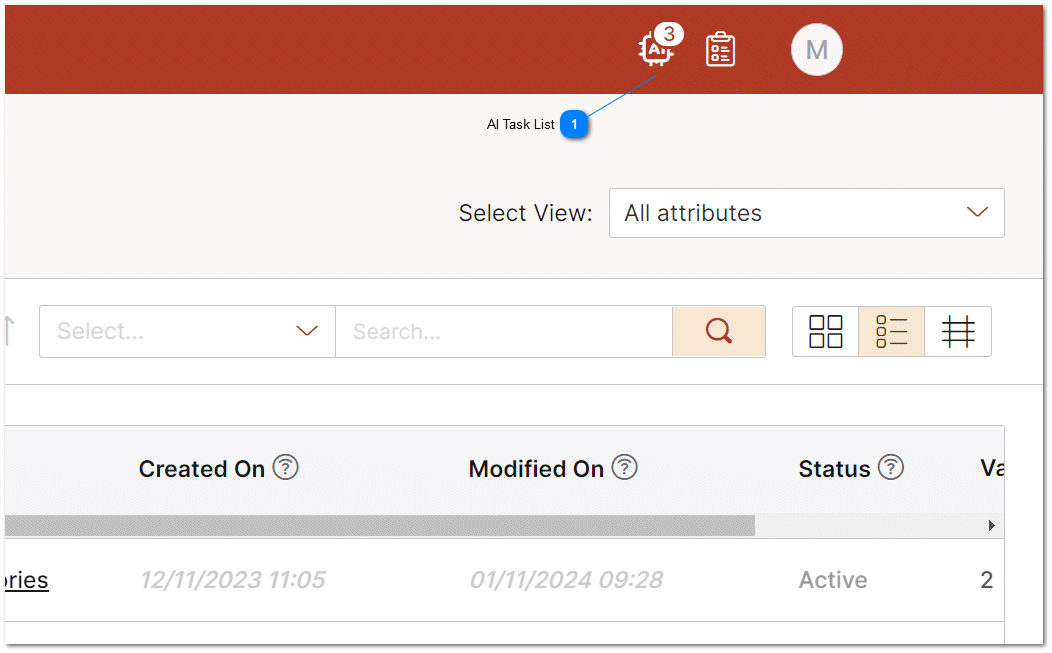
The AI Task list is located on the top right of the PIM user interface. The AI Task list is overlay with the current number of AI jobs that have been requested or that are in process.
 AI Task ListTo view a list of specific AI jobs that are in process and to review the AI results as well as apply them, click on the AI task list icon.
|
|
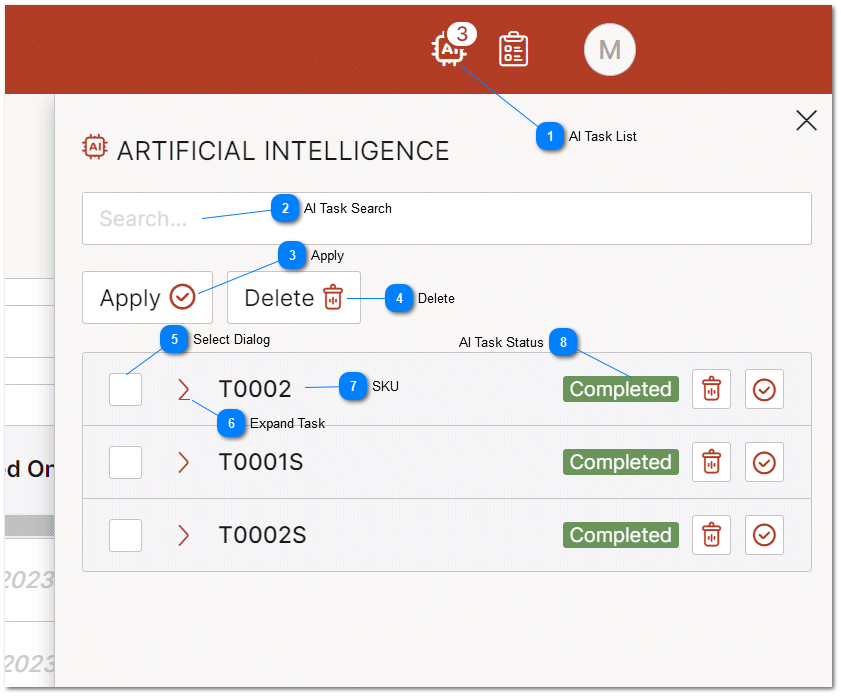
The AI task list displays a list of all of the current tasks that are pending in user's OpenAI Task list. OpenAI assigns an ID to each AI task when that task is created. PIMInto maintains a list of all OpenAI tasks requested from the PIM for each user who requests AI tasks from the PIM. Tasks with valid ID's for the current user are displayed in the list. Once an AI task has been submitted to the AI, the PIM must wait for the AI task to be completed. One the AI task has been completed, it can be reviewed in the AI Task list and Applied to the PIM. AI results are not automatically applied. Checking the check-mark next to specific AI tasks allows those specific task to be applied or deleted without being applied.
AI tasks are initiated from the users browser instance and sent directly to OpenAI API. The AI requests are not routed through PIMInto servers. A list of valid tasks is sent to the PIMInto servers so that if the browsers instance is interrupted the list of pending AI tasks for the current user can be retrieved and displayed.
 AI Task ListAI Task list icon is overlayed by the number of defined active AI tasks that are pending, completed or need to be reviewed. Clicking ion the AI Tasks Icon will open the AI task list.
|
|
 AI Task SearchFilter the visible tasks in the task list by the string value displayed in the filter dialog. This value should represent all or part of a SKU number that should be filtered on.
|
|
 ApplyClicking the "Apply" icon at the top of the AI Task List will apply all the AI results to the underlying PIM data for the AI Tasks where the selection checkbox has been set to true. Clicking the Apply icon on a specific AI Task will apply the results to the underlying PIM data for that specific task in the AI task list.
|
|
 DeleteClicking the "Delete" icon at the top of the AI Task List will delete all the AI results for the AI Tasks where the selection checkbox has been set to true. Clicking the Delete icon on a specific AI Task will delete only that specific AI task.
|
|
 Select DialogAllows for the the selection of multiple AI Tasks. A check marck in the dialog means the task is selected.
|
|
 Expand TaskExpand task expands the task details in the task list so that the input fields and output fields are visible for review. This is helpful to determine if the AI has returned good results that should be applied to the underlying PIM
|
|
 SKUDisplays the SKU number who's underlying data has been sent to the AI task and whos underlying PIM data will be updated if the AI results are applied.
|
|
 AI Task StatusThe current status ofg the AI tasks. Most AI tasks are returned relatively quickly and the browser should automatically update once the tasks have been perfomed by the AI. If the tasks appear to be taking too long or there is no change in status, refreshing the browser will send a status request tio the AI and the results will be updated. Completed tasks can be selected ad applied to the PIM. No data is updated in the PIM until an AI task has been "applied."
|
|
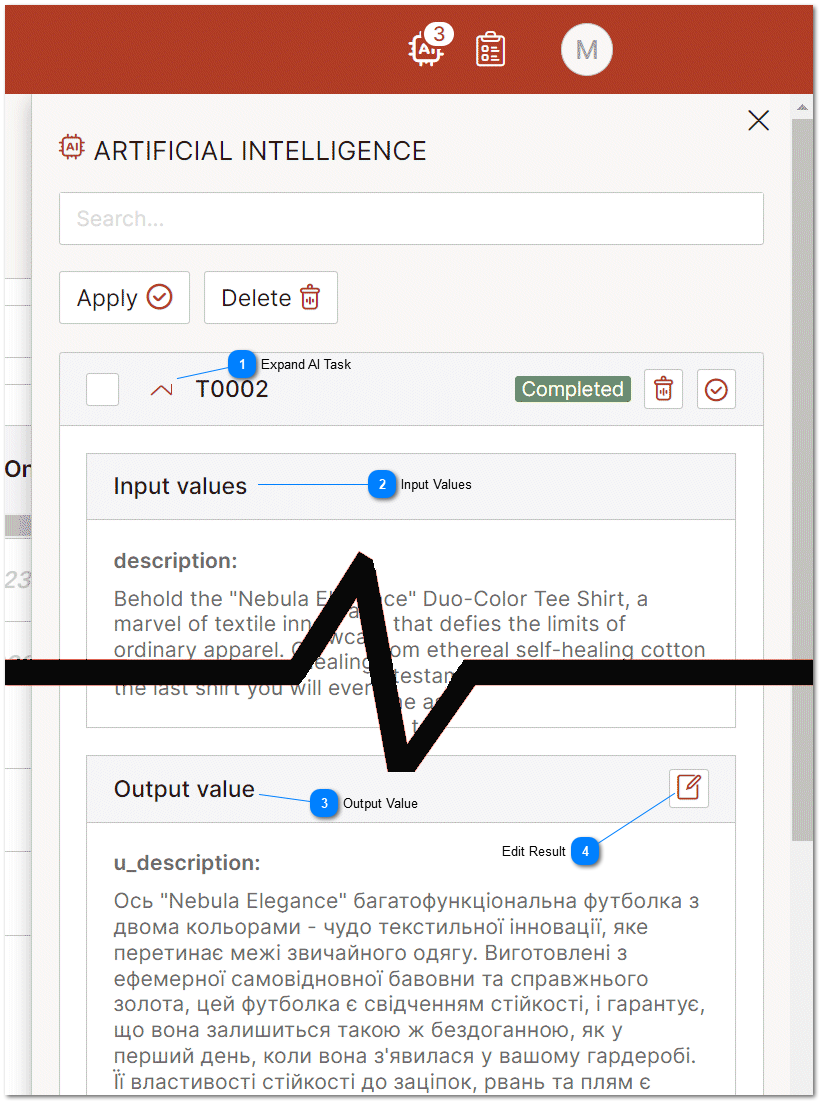
 Expand AI Task Expand task expands the task details in the task list so that the input fields and output fields are visible for review. This is helpful to determine if the AI has returned good results that should be applied to the underlying PIM
|
|
 Input ValuesThe input fields represent the data for each product or SKU that will be passed to the AI assistant for modification. In the case of the example displayed in this help topic, the English description will be passed to the AI for translation into the Ukrainian language for each selected SKU.
|
|
 Output ValueThe output value is the result returned by the AI Assistant upon successful completion of the AI assisted task. AI results are often not perfect or the AI will return results that are different than expected. The output value can be reviewed and edited by a human before it is optionally applied to the underlying PIM further eliminating the possibility of AI related errors.
|
|
 Edit ResultAllows the user to manually edit the result that was returned by the AI before it is applied to he
underlying PIM.
|
|
