When managing a product portfolio across multiple platforms and
channels, it's crucial to control and customize the visibility, import and export mapping of your product data based on varying requirements. With the increasing demand for more specific and targeted product information, being able to selectively display, import, export SKUs is as important as controlling attribute visibility. PIMInto's Product Information Management System (PIM) offers a powerful solution for this through its 'View' feature.
To create a PIM View a user must have the "Role" Access manager. To find out more about Access Group Roles please see
Roles
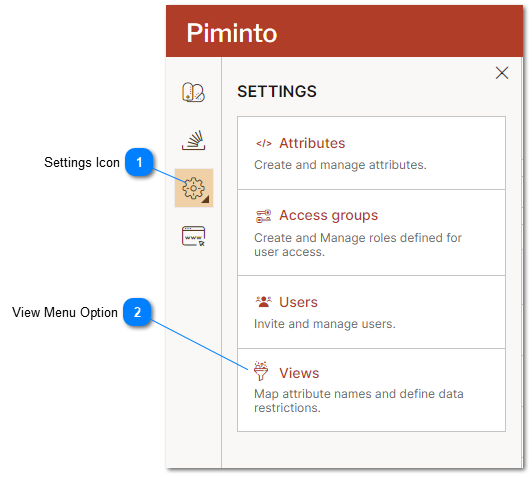
 Settings IconSettings icon opens the settings menu.
|
|
 View Menu OptionViews menu option opens the 'Manage View' settings where views can be created, edited and deleted.
|
|
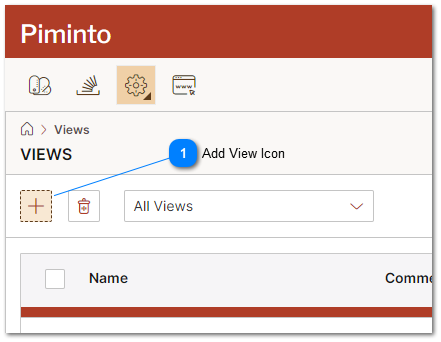
 Add View Icon
|
|
Step 1: View Name
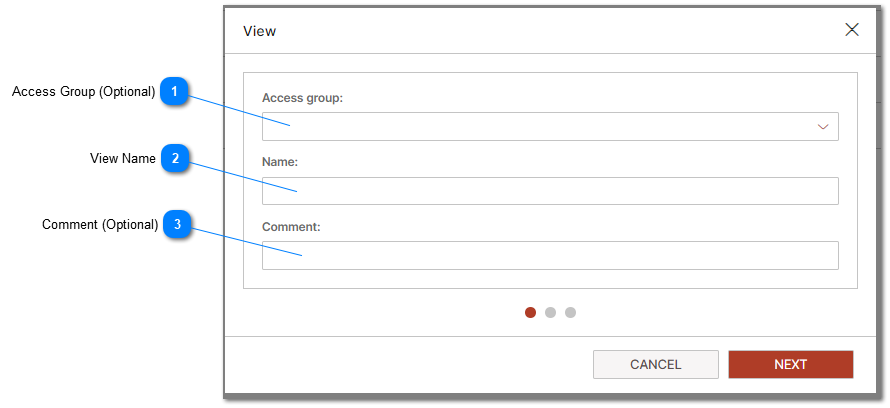
 Access Group (Optional)Assigning a view to an access group is optional. The option to assign the View to an access group when it is created is provided for convenience.
|
|
 View NameAll Views require a name. View names cannot have spaces or special characters.
|
|
 Comment (Optional)The comment field is used to provide a text description of the purpose of the view. The PIM may contain many views. having the ability to add comments to the View allows PIM users to be able to easily identify why a specific View was created and what it is used for.
|
|
Step 2: Adding Attributes to a View:
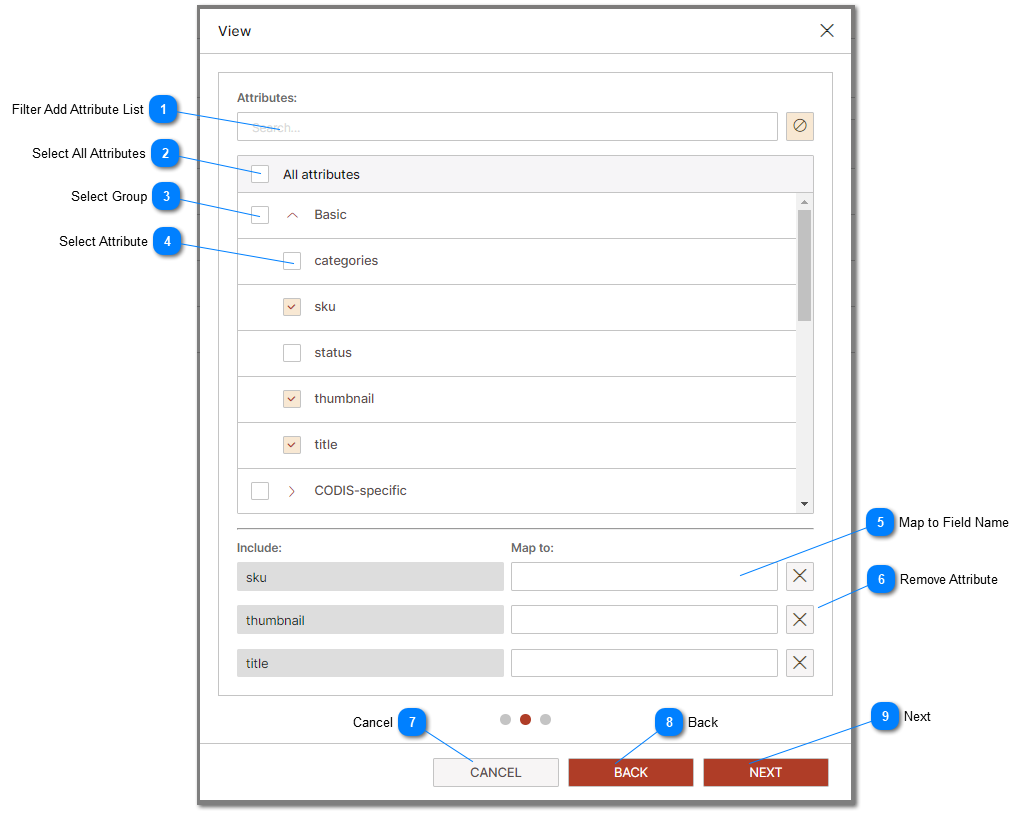
 Filter Add Attribute ListThe filter attribute list provides the ability to filter the list that displays the PIM attributes and find a specific attribute quickly. to filter the attributes shown in the All Attributes list type part or all of the For a sample of using the filter attribute list to find a specific attribute, refer to 'Filter Attribute List' sub topic described in detail later in this topic.
|
|
 Select All AttributesSelect all currently existing attributes and make them available to the View. In the case where you select all attributes at the time of creating the view only attributes that exist at the time of creating or editing the view will be added to the view. New attributes that are added after the View is created will need to be explicitly added to any View where you want that new attribute available.
|
|
 Select GroupSelect a specific group of attributes to make them available or accessible by the view. In the case where you a group of attributes at the time of creating the view, only attributes that are members of that group at the time of creating or editing the view will be added to the view. New attributes that are added to the group after the View is created will need to be explicitly added to any View where you want that attribute available.
|
|
 Select AttributeSelect specific attributes to be included in the View.
|
|
 Map to Field NameBy default all attribute names are the same as the original attribute name defined in the PIM. Attributes can be remapped to different names using the 'Map to' field. Type the mapped to name for the attribute that you want applied when this View is applied. View field mapping impacts anywhere a View is utilized. This includes import, export, channels, feeds and "Fast data serving" API. To remove a mapped field name from the View set the 'Map to:' value to blank. |
|
 Remove AttributeTo remove an attribute from the view click on the Remove Attribute icon. Remove attribute removes the actual attribute from the view. To remove a mapped field name from the View set the 'Map to:' value to blank.
|
|
 CancelThe "Cancel" button is a feature commonly found in user interfaces, including Product Information Management Systems (PIM). When clicked, the "Cancel" button cancels or aborts the current operation or action that the user is performing. It allows users to exit a form, discard changes, or abandon a process without saving any modifications.
|
|
 BackThe "Back" button is a commonly used feature in user interfaces, including the Product Information Management System (PIM). When clicked, the "Back" button navigates the user back to the previous page or screen they were entering and modify data.
The "Back" button can be used to go back to the previous form or screen without losing any entered information. It provides an option to review or modify data before proceeding.
|
|
 NextThe "Next" button is a common feature in user interfaces, including Product Information Management Systems (PIM). When clicked, the "Next" button allows users to proceed to the next step, page, or screen in a sequential process or workflow.
|
|
How to use the 'Filter' for the 'Add Attribute' List
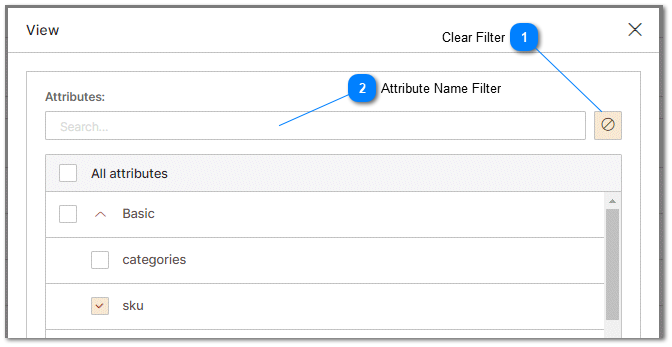
The filter attribute list provides the ability to filter the list that displays the PIM attributes and find a specific attribute quickly so that it can be added to the View..
 Clear FilterWhen clicked, the "Clear Filter" button clears the text entered in the "Attribute Name Filter" area, resulting in the display of all attributes available without any attribute name filtering applied.
|
|
 Attribute Name FilterLimits the attributes that are displayed in the attribute are to attributes that contain the text defined in the 'attribute name Filter' dialog box.
|
|
Step 3: Restriciting View Data
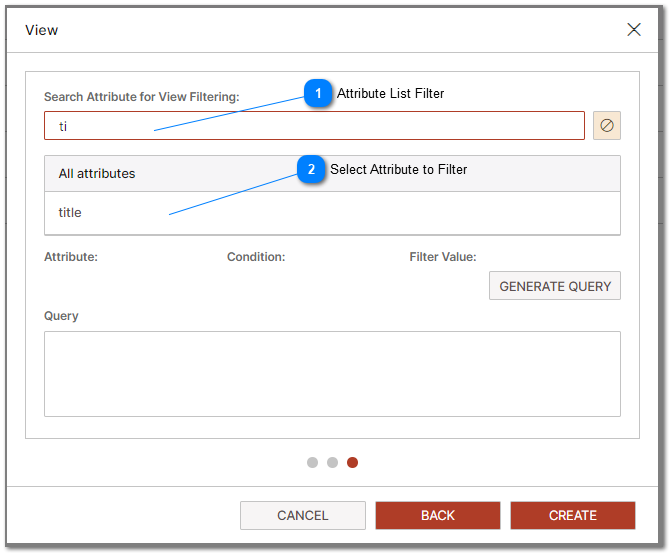
This step allows for the definition of more specific and targeted product skus to be select by, or restricted by restriction filters. allowing the selective display of certain SKUs, product line or brand data based on a defiend criteria.
 Attribute List FilterThe filter attribute list provides the ability to filter the list that displays the PIM attributes and find a specific attribute quickly. To filter the attributes shown in the Attribute Filter list type part or all of the attribute to display. This functionality is similar to 'Filter Attribute List' described above in this topic.
|
|
 Select Attribute to FilterClicking on an an attribute that is displayed in the attribute list adds the attribute to the list of attributes that are applied in the data restriction. The sample of adding 'title' is displayed below. Restrictions can can be associated with multiple different attributes. This allows restrictions to be applied based on multiple attribute data conditions. This will limit the data or number of SKUs that are returned by the View because the returned data must meet the conditions defined in this dialog for the selected 'View'.
|
|
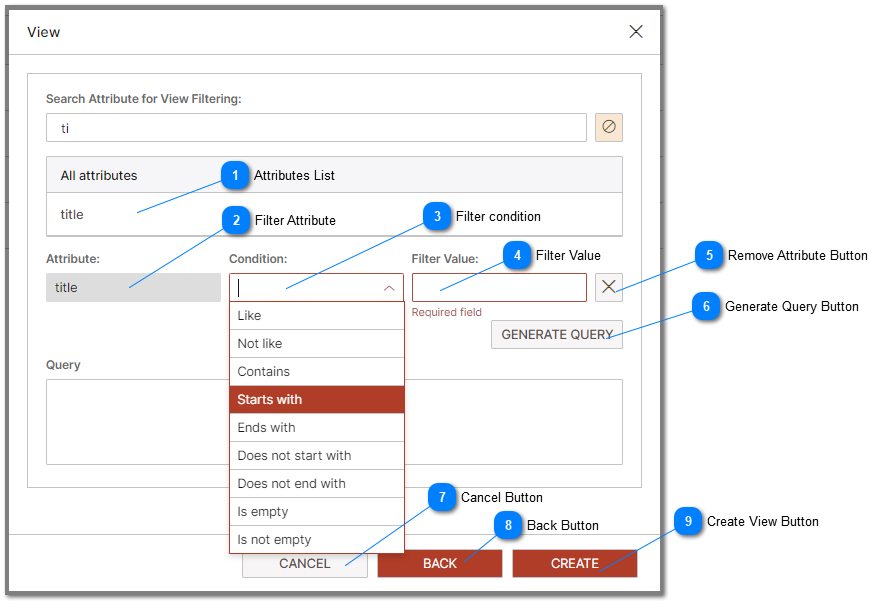
 Attributes ListComplete list of attributes that may be applied to the filter. The attribute list is filterable by the filter name by the attribute name filter expalined earlier in this topic.
|
|
 Filter AttributeRefers to the specific attribute that the filtering condition will be applied to in order to filter the data.
|
|
 Filter conditionThe filter condition should be selected from the predefined list of the supported filter options.
The predefined filter conditions in the list will be formatted and structured correctly and combined with the filter when the generate query button is clicked , ensuring the proper syntax is used when constructing the filter query. This helps prevent syntax errors that may occur if users manually input the filter condition.
Choosing from a list of filter conditions simplifies the user interface and improves usability. Users can quickly identify and select the appropriate filter condition without the need for manual input or remembering specific syntax.
|
|
 Filter ValueA string value is be used for pattern matching using various standard match patterns. These patterns help search and retrieve data based on specific criteria within the string. Here are some examples of standard match patterns commonly used by the 'Views'.
Wildcards:
'%' (Percent Sign): Matches any sequence of characters, including zero characters. For example, 'a%' matches strings starting with 'a' such as 'apple' or 'ant'. If no wild card is defined then the string must be an exact match.
'_' (Underscore): Matches a single character. For example, 'h_t' matches strings like 'hat' or 'hot' where the second character can be any character.
|
|
 Remove Attribute Button The "Remove Attribute" button is a feature within a Product Information Management System (PIM) that allows users to remove a specific attribute and its associated filter conditions from the list of attributes used in the view filter query generated by the query builder displayed on this form.
By clicking the "Remove Attribute" button, users can selectively remove specific attributes from their filter conditions. This feature provides flexibility and control over the attributes used in the query, allowing users to fine-tune their data retrieval and analysis within the PIM.
|
|
 Generate Query ButtonThe "Generate Query" button is a functionality within a Product Information Management System (PIM) that automatically generates the filter query based on specified criteria or selections.
When the "Generate Query" button is clicked, the PIM analyzes the chosen filter options and generates a query statement that represents the desired filter conditions. This query statement is typically in a format that is compatible with the underlying database or search engine used by the PIM.
The generated filter query is then used to retrieve the relevant data or records from the PIM database, providing a filtered subset of products that meet the specified criteria. This allows users to quickly and accurately narrow down their search results or view specific subsets of products based on their preferences.
By automating the query generation process, the "Generate Query" button simplifies the task of constructing complex filter conditions and ensures accuracy and consistency in filtering data within the PIM. It eliminates the need for manual query writing, reducing potential errors and saving time for users who need to apply custom filters to their product data.
|
|
 Cancel ButtonThe "Cancel" button is a feature commonly found in user interfaces, including Product Information Management Systems (PIM). When clicked, the "Cancel" button cancels or aborts the current operation or action that the user is performing. It allows users to exit a form, discard changes, or abandon a process without saving any modifications.
|
|
 Back ButtonThe "Back" button is a commonly used feature in user interfaces, including the Product Information Management System (PIM). When clicked, the "Back" button navigates the user back to the previous page or screen they were entering and modify data.
The "Back" button can be used to go back to the previous form or screen without losing any entered information. It provides an option to review or modify data before proceeding.
|
|
 Create View ButtonThe "Create" button is a feature commonly found in user interfaces, including Product Information Management Systems (PIM). When clicked, the "Create" button initiates the process of creating a new 'View' based on the data entered in the forms. This includes validating the entered data, creating the view, and applying any relevant restriction filters.
By defining the 'View' and clicking the "Create" button, users can create personalized views of product information tailored to their requirements. This enhances the efficiency and effectiveness of data security and control over the displayed information, improving data relevance and usability.
|
|
Sample Generated Restriction Filter Query:
In this sample, the attribute "title" is being filtered using a specific condition: [[title]] LIKE 'A%'.
The filter is applied to the "title" attribute and utilizes the LIKE operator, which performs pattern matching. The pattern specified is 'A%', which means that it is searching for titles that start with the letter 'A'.
By applying this filter, the system will retrieve only the product titles that meet the condition, i.e., titles that begin with the letter 'A'. This allows for targeted data retrieval, helping users find and work with specific subsets of products that match the specified criterion.
The filter statement can be further customized using different operators and patterns to refine the filtering process according to specific requirements.
Available Filtering Conditions:
Different filtering operators can be used to perform specific comparisons and match patterns within the data. Here's an explanation of commonly used operators and their functions:
LIKE: The LIKE operator is used for pattern matching based on wildcard characters. It allows for simple pattern matching using '%' (percent sign) as a wildcard for any number of characters and '_' (underscore) as a wildcard for a single character. For example, 'LIKE 'a%'' matches strings starting with 'a', such as 'apple' or 'ant'.
NOT LIKE: The NOT LIKE operator is the negation of the LIKE operator. It excludes the patterns that match the specified condition. For example, 'NOT LIKE 'a%'' will exclude strings starting with 'a'.
CONTAINS: The CONTAINS operator is often used with full-text search capabilities in certain database systems. It matches rows where the specified column contains the given search term. For example, 'CONTAINS( '%keyword%')' will return rows that contain the specified keyword.
ENDS WITH: The ENDS WITH operator is used to match strings that end with a specific pattern or set of characters. It is commonly used with the '%' wildcard. For example, 'column LIKE '%ing'' matches strings that end with 'ing', such as 'running' or 'singing'.
DOES NOT START WITH: The DOES NOT START WITH operator negates the condition of a string starting with a specific pattern. For example, 'column NOT LIKE 'abc%'' excludes strings that start with 'abc'.
DOES NOT END WITH: The DOES NOT END WITH operator negates the condition of a string ending with a specific pattern. For example, 'column NOT LIKE '%xyz'' excludes strings that end with 'xyz'.
IS EMPTY/IS NOT EMPTY: These operators check if a column or attribute is empty or contains a value. 'IS EMPTY' matches rows where the column has no value or is null, while 'IS NOT EMPTY' matches rows with a non-null value.

