Setup Layout allows the user to define their preferences for the "Left Column Attributes" on the
Product Detail Page. The "Left Column Attributes" refer to a specific subset of product attributes that are chosen to be displayed on the left side of the product details page in the product preview area. The product preview area typically showcases essential or key attributes that are used to provide a quick and concise overview of the product's most important information.
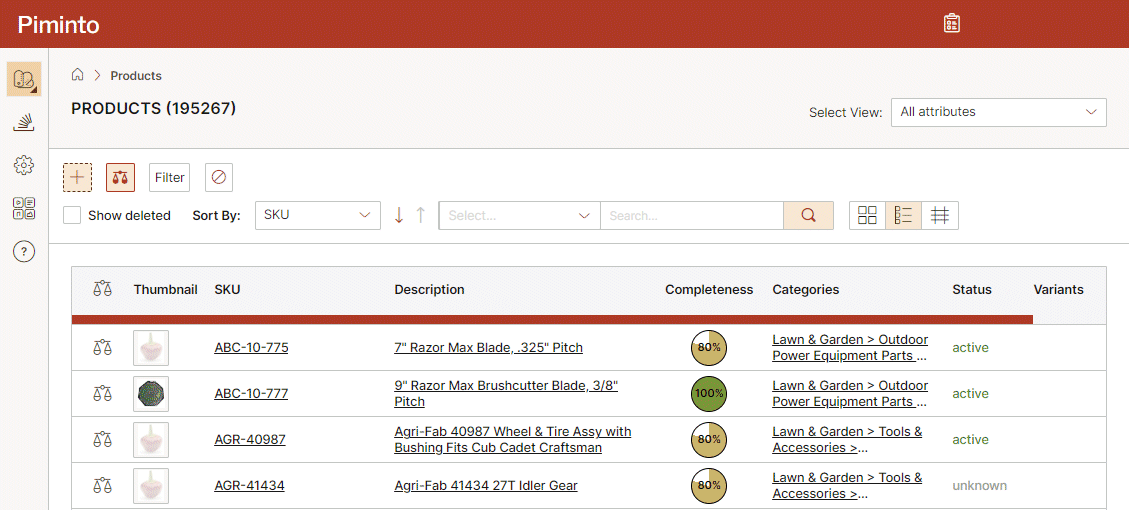
Setup layout impacts multiple layout views, not just the Product Details page. The attributes selected for display on the Product List View page are determined by what columns are selected for display on the Product Details Page's Left Preview Area.
When designing the product details page, users can select a set of attributes from the complete list of available attributes associated with the product. These selected attributes are considered the most important and relevant for the users to quickly identify and understanding the product. The chosen key attributes are displayed in a designated section on the left side of the product details page, typically in a compact and organized format. This area is the product preview area, provides users with a snapshot of critical product information without the need to scroll or explore the entire page.
Typically These attributes include product name, SKU, brand, primary image, price, availability, and other essential details. The selection of "Left Column Attributes" can be customized based on the specific needs or the preferences of the user, providing flexibility in tailoring the product preview area to optimize the user experience and support efficient product exploration.
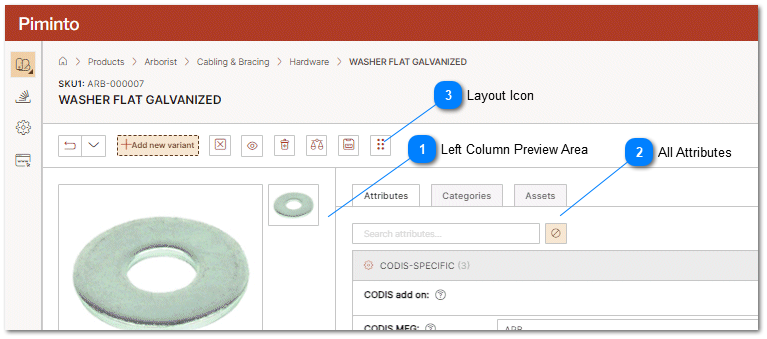
 Left Column Preview AreaThe most common attributes should be displayed in this area. By default in this area contains the SKU, Title and Thumbnail. Clicking on the layout Icon allows the attributes that are displayed in this area to be defined by the user.
|
|
 All AttributesOn the right side of the product detail interface, all attributes associated with the product are typically displayed. These attributes show comprehensive details about the product and are not affected by the changes made in the product preview area.
|
|
 Layout IconThe "Layout Icon" is a user interface element in PIMInto PIM that enables users to customize the visibility of attributes in the product preview area on the left side of the product detail interface. When users access the product detail interface, they see a preview area on the left side that provides an overview of the selected product. This area displays essential product information, such as product name, thumbnail image, SKU, and other key attributes.
|
|
By clicking on the "Layout Icon" a configuration or customization panel is opened, allowing users to manage the attributes displayed in the product preview area. Inside the configuration panel, users can see a list of available attributes associated with the product. They can then choose which attributes should be visible in the product preview area. This is achieved through checkboxes.
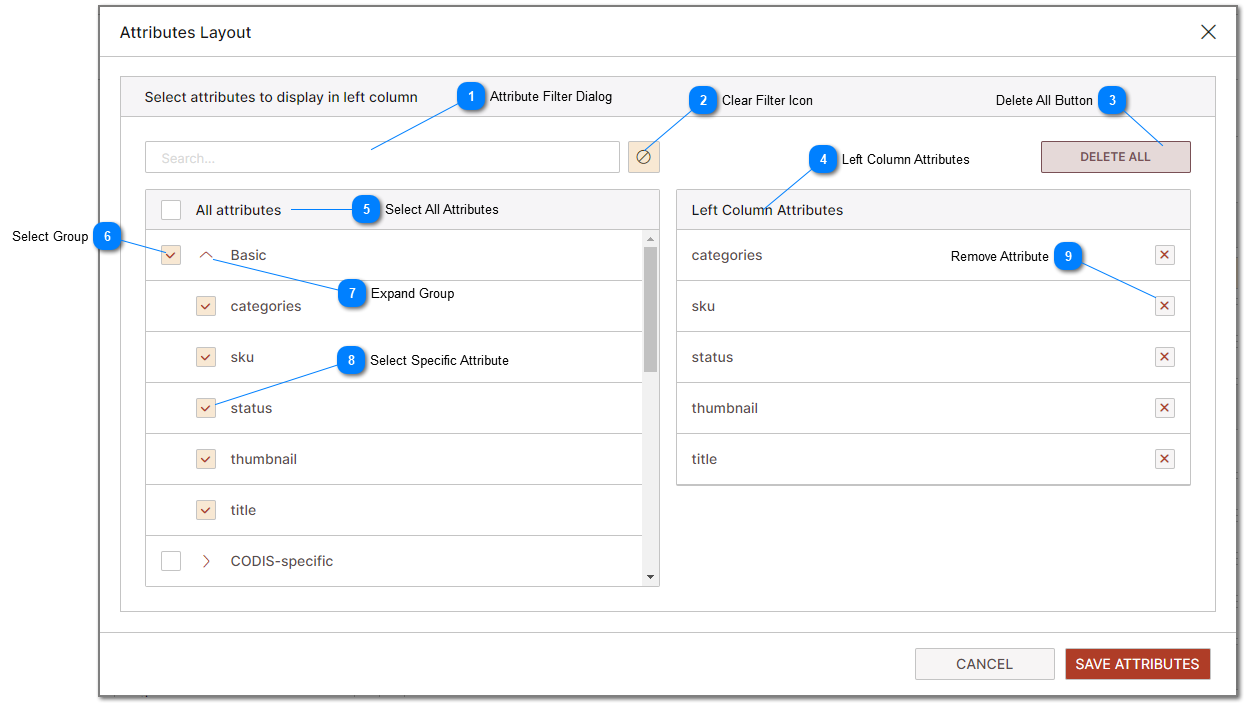
 Attribute Filter DialogThe "Attribute Filter Dialog" is a user interface component that allows users to quickly filter and find a specific attribute within the attribute selector. The attribute selector is a feature that enables users to choose attributes from a list for display in the Product Preview area on the left of the product detail page.
|
|
 Clear Filter IconThe "Clear Filter" icon is a user interface element in the Attribute Filter Dialog that allows users to remove any applied filter criteria and display all attributes in the attribute selector. When users click on the "Clear Filter" icon, it resets the filtering functionality, and the attribute selector shows the complete list of available attributes without any filtering applied.
|
|
 Delete All ButtonThe "Delete All" button is a user interface element that allows users to remove all selected attributes from the list of attributes that will be displayed in the Product Preview area on the Product Detail Screen. The "Delete All" button provides users with an efficient way to reset or modify their attribute selection quickly. It allows users to clear the Product Preview area and start fresh and add a new set of attributes they wish to view without the need to manually deselect each attribute one by one.
|
|
 Left Column AttributesThe "Left Column Attributes" refer to a specific subset of product attributes that are chosen to be displayed on the left side of the product details page in the product preview area. The product preview area typically showcases essential or key attributes that are used to provide a quick and concise overview of the product's most important information.
The use of "Left Column Attributes" in the product preview area enhances usability and helps users make quick decisions based on critical information. It allows users to grasp the product's key characteristics at a glance, especially when they need to browse multiple products rapidly.
|
|
 Select All AttributesSelecting all attributes to add them to the product preview area should be used with caution, especially when products have a large number of attributes or when only a limited subset of attributes is relevant for the product preview. If the product has many attributes, displaying all of them in the product preview area can lead to clutter and overwhelm the user. The product preview area has limited space to display attributes. If all attributes are added, it may result in an overcrowded layout, potentially leading to poor readability and user experience.
By carefully curating the attributes displayed in the product preview area and offering customization options, you can enhance the user experience and ensure that users receive the most relevant and concise information without overwhelming them with unnecessary details.
|
|
 Select GroupThe "Select Group" feature allows users to add all attributes belonging to a specific attribute group to the product preview area ion the Product Details page. Attribute groups are assigned to attributes either at the time the attribute is created or when a View is defined.
|
|
 Expand GroupThe "Expand Group" feature allows users to expand the list of displayed attributes to show all attributes assigned to a specific Group. Once an attribute Group is expanded the individual attributes within that Group can be selected for display in the Product Preview area of the product detail page.
|
|
 Select Specific AttributeTo select a specific attribute for display in the product preview area the user can select the product using the checkbox next to the attribute
|
|
 Remove AttributeTo remove a specific attribute from the product preview area the user can delete the attribute from the Left Column Attributes list by clicking on the Delete Icon next to the attribute that should be removed.
|
|


